Sunday, August 30, 2009

Sugar cookies...

As I promised, here is the recipe for the sugar cookies that you so beautifully did today.


Sugar Cookies

3/4 cup of room temperature margarine or butter
1 cup white sugar
2 eggs
1 tsp. flavouring (vanilla or lemon)
2 1/2 cups sifted all purpose flour
1 1/2 tsp. baking powder
1/2 tsp. salt
And then...
  1. Cream margarine or butter and add sugar until light and fluffy.
  2. Add eggs and flavouring and beat until smooth.
  3. Sift flour. Measure and resift with baking powder and salt.
  4. Mix dry ingredients with creamed mixture until a stiff dough is formed.
  5. Refrigerate dough at least one hour.
  6. Roll and cut shapes. Bake on ungreased baking sheet at 400 degrees for 6-8 minutes until delicately browned.
  7. Cool completely and layer and freeze or decorate and serve.
I hope you enjoy this recipe. It was given to me by my dear sister in law, about 5 years ago, for Christmas. I had to make about 300 cookies for the school, so I became quite familiar with this recipe, and I have been using it ever since. It works all the time!

Saturday, August 29, 2009

Gluten-Free Cake and more sugar lillies...


I used a gluten-free recipe for this cupcake. The recipe is quite good, but the result is a much more dense cake, cookie-like. Nevertheless, for those students that are looking for a gluten-free cake, this is really worth trying. The recipe uses white rice flour and was taken from "125 Best Gluten-Free Recipes" by Donna Washburn and Heather Butt. I used the White Cake recipe, but they have a whole section with Pies and Cakes, with quite a few other recipes like a Chocolate Fudge Cake, Angel Food Cake... They even have a Cheesecake recipe!
Gluten-Free White Cake Ingredients
2/3 cup white rice flour
1/2 cup tapioca starch
1/3 cup cornstarch
3/4 tsp xanthan gum
1 1/2 tsp gluten-free baking powder
1/2 tsp salt
1/2 cup shortening or butter
3/4 cup granulated sugar
3 eggs
3/4 tsp vanilla extract
1 tsp cider vinegar
1/2 cup milk
*All ingredients available at either Whole Foods or Superstore
  1. In large bowl, sift rice flour, tapioca starch, cornstarch, xanthan gum, GF baking powder, and salt. Resift and set aside.
  2. In separate bowl, using an electric mixer, cream shortening or butter and sugar until light and fluffy. Add eggs, one at a time, beating well after each addition. Stir in dry ingredients alternately with milk. Stir jut until combined after each addition. Spoon into prepared 8" pan. Spread to edges and smooth top with a moist rubber spatula. Let stand for 30 minutes.
  3. Bake in preheated oven (350 degrees) for 35 to 40 minutes or until a cake tester inserted in the center comes our clean. Let cool in the pan on a rack for 10 minutes.

Due to special requirements, I had to make this cake without cornstarch, milk, vinegar or vanilla extract. I replaced the cornstarch for tapioca starch, the milk for soy milk, left out the vinegar and vanilla extract all together, and even then I obtained quite a good product. My husband and children (always eager to be my judges) loved the cake, and the cupcakes I made with the full recipe were long gone before I could finish decorating them!

Tuesday, August 25, 2009

Sugar Lillies...

This stunning cake with sugar Lillies and butterflies was created by BC Cakes for a very unique wedding, coordinated by Angela Girard from Reflection Events All the Lillies and butterflies were hand made.

Sunday, August 16, 2009

A different kind of shoes...


I just wanted to show you how quickly times goes by... One day you are loving these baby shoes, so sweet... and then all of a sudden, that little girl is looking for bridal shoes... Anyhow, this is just a sugar world... sugar and spice, and everything nice... Enjoy it!

Tuesday, August 11, 2009

Sunday, August 9, 2009

From the Vancouver Art Gallery with love...

This cake was hand painted with edible gold... and Vodka! I find the best way to dilute your colours when painting on fondant is with Vodka...

Wednesday, August 5, 2009

Cakes with passion...

Cakes in black and white... and then red... No matter how you look at them... they are awesome cakes...

How to make Chocolate Fondant...


This recipe is for Nora. I always end up missing my students after they finish all their courses... I don't know! But after sharing so much cake and icing for about 4 months, there is that kind of a sweet bond...
Anyway, as I promise Nora, here is the recipe for making Chocolate Fondant. You need to start with a Chocolate Paste first (sometimes called Plastic Chocolate).
Chocolate Paste
500 gr. Chocolate
150 gr. Liquid glucose
50 gr. liquid sugar*
  1. Melt chocolate in double boiler, but do not overheat
  2. Combine glocose and liquid sugar in a bowl, and add to chocolate
  3. Stir mixture with wooden spoon until blended, but do not beat
  4. Transfer to a plastic bag and store for 24 hours at room temperature before using it. Do not place in the refrigerator.
  5. Before using it, knead the paste until pliable.

*Liquid Sugar (very easy to make, Nora)

  • 4 parts of sugar
  • 3 parts of water

Combine ingredients, bring to boil for 3 minutes. Cool to room temperature, and store in glass container. Keep cool but not refrigerated.

Now, with this chocolate paste, you could make chocolate roses, for example. But to cover a cake, I would mix the Chocolate Paste with regular fondant. Half fondant, half Chocolate Paste. The flavour is still very good!

Sunday, August 2, 2009

Happy Birthday Mamá!

As I read through "Julie and Julia" film reviews (in cinemas on August 7th), all those comments about Julia Child's passion for food and cooking, I cannot but think of you, and how much you enjoyed and loved cooking, taking cooking to the next level... I haven't eaten the same since you were here (my cooking sucks!). But with cakes, then it is a different story, then...mmm... I better not start... Baking and making cakes is where I really connect with you, mamá... I miss you! Happy Birthday!


Saturday, August 1, 2009

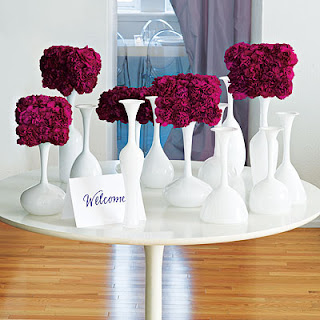
Carnations... Trudeau's favourite flower...

It seems to me that carnations have been underappreciated for quite a while... Students from the Gum Paste course seem to have divided opinions about carnations when they get to make them out of gum paste...

So, I am going to let the images to convince you about how pretty carnations can look. Pictures come via Martha Stewart, myhome ideas.com, Real Simple, and the knot


I almost forgot this picture via InStyle